TD Tools
AttrTools
Status: Alpha release - Spring 2017
Last Updated: 09.12.2017
Overview
cgmAttrTools are a collection of tools for making working with attributes in maya a little less opaque.
Note
Still refining value pushing copying workflow
What can I do with it?
- Easy attribute adding, setting and editing
- Succinct, sortable display of node attributes and data about them
- Value pushing - current data, next/previous frame, forward/back on timeline and all.
- Multi setting and more
Accessing
- UI - Top cgm menu -
CGM > TD > Attributes > cgmAttrTools - Toolbox -
TD Tab> Rigging > AttrRow > cgmAttrTools - MarkingMenu -
TD Mode > Utils (NW) > Attr (SW) > attrTools 2.0 (SW) - Python
import cgm.core.tools.attrTools as ATTRTOOLS
ATTRTOOLS.ui()
If you open the ui, you should see something like this:
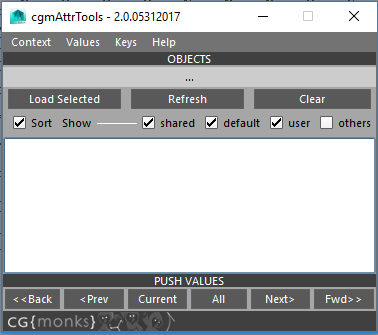
The UI has two main parts. The top menu and body.
Menu
The top menu is where we set our options.
Context
Introduced this concept with our 2.0 rewrite and the marking menu. In short, it is an easy way to work on numerous items at once in a clear manner. Not every function in the ui is contextual.
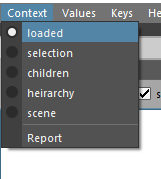
loaded- Any objects loaded in the tool will be acted onselection- Only act on selected nodes. Attributes in context will be those selected in ui, then any selected in channel box will be extended to that list.children- may go away, testing for attrToolshierarchy- may go away, testing for attrToolsscene- may go away, testing for attrToolsreport- Report current context data without making any value or time changes
Values
For value pushing. What values will be pushed in selection and key context
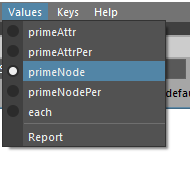
primeAttr- The current values of the first attribute in your ui selection will be pushedprimeAttrPer- For each key, the primeAttr's value at that time will be pushed to the othersprimeNode- The current values of all selected attributes in the ui will be pushedprimeNodePer- For each key, primeNode's selected attrs will be pushed to other nodeseach- Each contextual object's current values will be pushedreport- Report current value data without making any value or time changes
Keys
For value pushing as well. Specify how key data is understood and combined by the tool.
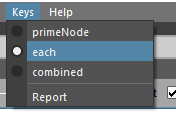
primeNode- The keys of the primeNode will be usedeach- Each object's keys will be used for their respective value pushescombined- The keys of all contextual nodes are combined and each object will be value pushed on each of those keysreport- Report current key data without making any value or time changes
Body
Objects
At the top of the body is a mel label which will update to let us know information about what we're working with. This is where you load objects which will be used to load our attribute data.
Load selected- Loads selected objects to the ui. First object is the 'prime' object.Report- May get rid of, just playing with if necessityClear- Clear selected objects
When you load mulple objects...
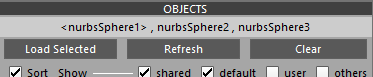
The prime node is the first in the selection and represented by the <nurbsSphere1>.
Sort Row
Sort- Sorts loaded attributes alphabeticallyShared- if more than one object is loaded, ONLY loads attributes shared by loaded objects.Default- Designed to quickly get the most useful attributesOn- Only loads 'normal' attributes which are keyable and or user definedOff- every settable attribute loadsUser- load user defined attributes or notOthers- Every attribute on the object
Attribute List
This may seem overwhelming at first but it's not too bad once we break it down. Each line is an attribute. You can select more than one attribute at once.
- Double clicking a row will bring up an uiPrompt to set the value.
- With message attributes any objects selected will be stored if you double click a message attrtribute. If more than one item is selected, the attribute will be converted to multimessage if it is single.
Here's a loaded list:

To get a better idea of what we're looking at let's look at a couple examples:
Example 1:

settings- Attribute long nameenum- Attr typeu- User definedv- Visible in channel boxk- Keyable[off],on- With an enum, options displayed with the current option wrapped in[].
Example 2:

rotateX- The attribute long namealias(hi)- This attribute it aliased with a name ofhida- doubleAngle attr typev- Visible in channel boxk- Keyable<anim- Animation curve input (it's keyed)>>>- Outbound connection on this attribute19.679...- Current Value
Popup menu
Right clicking any of the attribute rows will bring up a pop up menu...
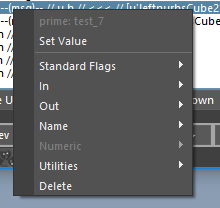
Most of these functions are multiset. Meaning any selected attributes on loaded objects will be modified. .
Note
You must reselect the attributes if you make selection changes and in selection context so the menu can rebuild. It rebuilds on ui selection.
Set Value
- A promptDialog is offered to provide a value.
- Providing an empty dialog with
okwill clear said value in general. For example, clearing the defaultValue from the dialog in the promptDialog will clear the defaultValue on the selected attribute(s) - If you a message attribute is selected, selected objects will be stored.
- enums may be set by index or string
- list values are accepted via comma split for vector type attributes
- bool accepts
1/0,t/f,true/false,y/n,yes/no
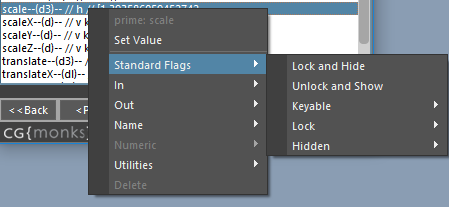
Standard Flags
Lock and Hide- both at onceUnlock and Show- both at onceKeyable/Locked/Hidden- Bool options to change values
Connections
This one is a lot packed into a single section. Let's dig in.
In
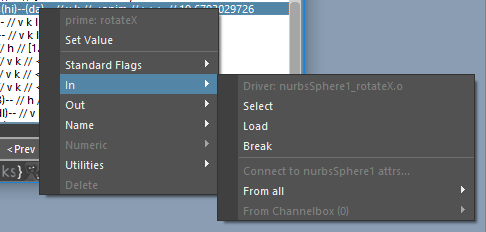
obj.attr- If connected, name of driverSelect- Select the connectionLoad- Load the driver to the uiBreak- Break connectionFrom All- Only enabled with multiple selected objects. If enabled, connects all the prime attributes from the specified object back to our prime.From Channelbox- Only enabled if there are channelbox selected attributes AND the len of channelbox attrs match that of the prime attrs. Uses the channelbox attrs to drive from our specified objectList of attributes of our driven
List of objects we can connect in
- List of attributes to connect in
Out
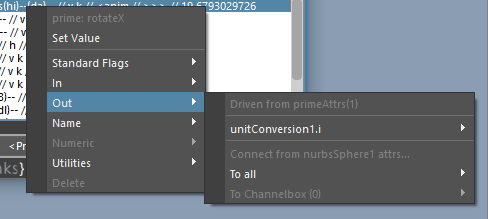
List of driven attributes
Select- Select the connectionLoad- Load the driver to the uiBreak- Break connection
To All- Only enabled with multiple selected objects. If enabled, connects all the prime attributes from prime to selected objects or all othersTo Channelbox- Only enabled if there are channelbox selected attributes AND the len of channelbox attrs match that of the prime attrs. Uses the channelbox attrs to drive from our specified object
Name
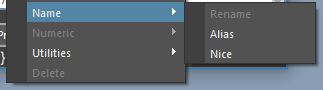
Rename- Only userDefined attribute may be renamedNice- Set the nice name of an attributeAlias- Set an alias of an attribute
Numeric
Set and clear values via promptDialog.
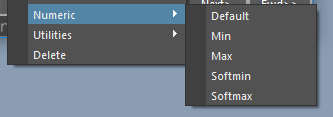
DefaultMinMaxsoftMinsoftMax
Utilities
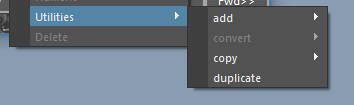
Add- add a new attribute from a selection of types. A promptDialog is provided to name it.Convert- Convert a userDefined attr to another typeCopy- Copy the selected attributes in context to other targets. A promptDialoge is provided to get a nameTo- Copy from the primeNode to other targetsConnectBack- Copy and connect back to the primeNode. Driving the primeNodeConnectTo- Copy and connect to the other nodes. Driving the new attributes.
Duplicate- Duplicate an existing attribute on the loaded objects. A promptDialog is provided to name it.Delete- Only userDefined attributes may be deleted.
Move Row

Move buttons only show up when user defined attributes are visible. The let you move attributes in the channel box that are visible.
Move Up- Move selected attributes up in the channel boxMove Down- ...down...
Push Values
Values are pushed on nodes by their context, values and key options in the menu at the top of the ui.

Current- Push the current values to contextual nodes. If only one node is loaded if you're not in primeAttr or primeAttr per node, it's not gonna do anything.<<Back-Push to all previous keys from the current time<Prev- Push to the first previous key from the current timeAll- Push to all contextual keysNext>- Push to the next key from the current timeFwd>>- Push to all keys after the current time
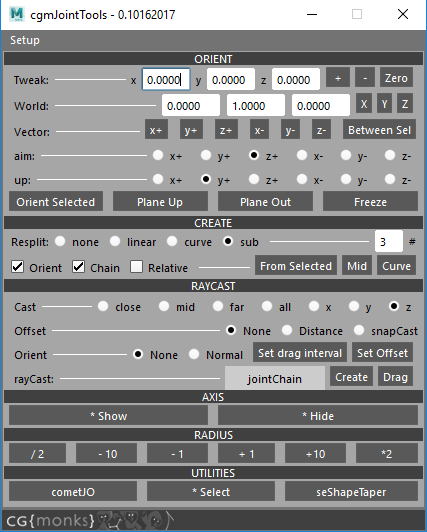
JointTools
Last Updated: 16 October 2017
Overview
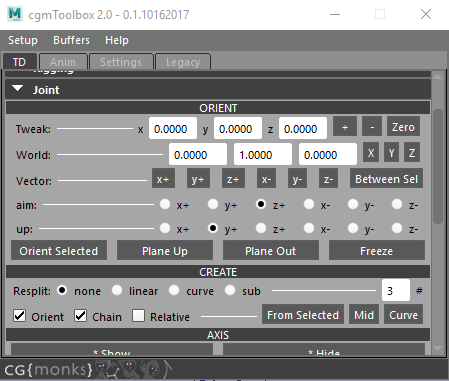
cgmJointTools is our attempt at an all in one joint creation and orienting tool for our own purposes. We hope you find it useful as well.
What can I do with it?
- Create joint chains be selection or curve and resplit by multiple methods
- Tweak and edit joint orientation values in multiple ways
- Define world up vector by object axis or a vector between two objects
- Access rayCast joint creation tools (stand alone ui only)
- Orient and snap joints on a plane for fingers or limbs
- Relatively tweak joint radius values contextually
Accessing
UI - standalone
- Top cgm menu -
CGM> TD/Rigging> > Joints > cgmJointTools - Marking menu (several of them) -
cgmJointTools
- Top cgm menu -
UI - Nested
- You can find most of the tools nested in the cgmToolbox
Python
import cgm
cgm.core.tools.jointTools.ui()
UI
If you open the stand alone ui, you should see something like this:
Note
When you load it as a standalone, RayCast create options are availabe as well. Seemed overkill to have that in the Toolbox version as well.
Orient
Tweak
Full props to Michael Comet for the logic on this one in his fantastic cometJO.

Change the current jointOrient values on selected joints by provided amounts in a relative manner.
x[ ] y[ ] z[ ]- Set the relative values+- Add to the current values-- Subtract to the current valuesZero- Clear out the fields.
Vector/Aim
With orientation we're talking about the up vector for aiming for the orientation processes. We have a couple of ways of defining it.

World- You can set to standard axis by theX,Y,Zbuttons or manually input values.x+...- With a selected object, pick an axis which will general a vector and input it to the fieldsBetween Sel- If you select two objects, the vector from the first point to the second will be measured and input
Aim/up axis directions are how joints will be aimed and oriented. Aim is from one to the next in the chain, up will go by the defined world vector.
Aim- Set the aim axis of oriented jointsUp- Set the up axis of oriented joints
Note
When no parent or child joints are detected, joints will be oriented to the world following the aim/up axis
Functions

Orient Selected- Orient selected joints following the user's settings[]Relative- Affects orientation. Relative mode reevaulates the up vector from the parent. This supports better orientation for twisting joint segments.
Plane Up/Out- Planar orientation creates a snap plane to help fingers and limbs for examples all be on the same rotation plane.- 3 joints are required
- Up/Out defines which axis the plane will be cast through - the joints up or out axis. For fingers, you probably want up. For an arm out would probably make more sense.
Freeze- Our freeze orienation function as we don't like maya's.
Create
Joint creation is based on selection. There are several main methods. When we resplit, it can be by the selection generated curve or an existing one.

From Selected- Create new joints based on selection. Can be transforms or componentsMid- Create a joint at the mid point of the selectedCurve- Build joints along selected curve(s)
Note
Mid only creates mid joint from selection. The other modes support the extra behaviours.
What follows are the options that each mode can use.
Resplit- Resplit a given curve or selectionNone- No resplitLinear- Linear curveCurve- Cubic curveSub- Resplit between each root. Only supported infrom selectedmode
[5]#Set the number of joints for resplit[] Orient- Whether to orient created joints[] Chain- Whether to parent created joints[] Relative- Relative orienation mode where the last joint's up is used as the new up vector
Note
Context can be changed via the first menu in the cgmToolbox or cgmJointTools
RayCast
Only shows up in standalone ui. See toolbox section
Axis
*Show- Show axis (CONTEXTUAL)*Hide- Hide axis (CONTEXTUAL)
Radius

Contextual radius editing.
/2- In this case take current, then divide by 2.-10- ... current - 10-1- ... current - 1+1- ... current + 1+10- ... current + 10*2- ... current * 2
Note
Context can be changed via the first menu in the cgmToolbox or cgmJointTools
Utilities
cometJO- Tool by the brilliant Michael B. Comet for orienting joints*Select- Select joints. (CONTEXTUAL)seShapeTaper- Tool by our good friend Scott Englert for splitting sdk 'poses'
TransformTools
...
DynParentTool
Status: Alpha release
Last Updated: August 2017
Overview
The dynamic parent tool is for setting up and managing dynamic parent setups for controls in rigs. Underlying tech was creating during Morpheus 2 development. Acknowlegments to our friend John Doublestein for the initial seed of how to do this.
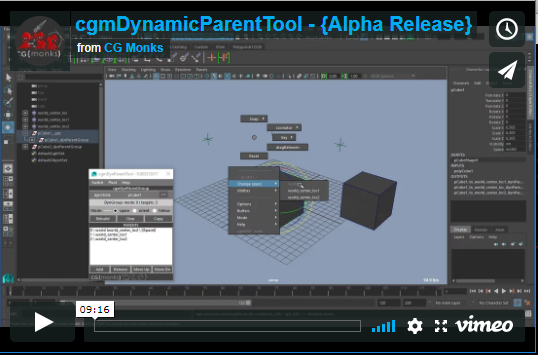
Until we get embeded video sorted. Please use this link: https://player.vimeo.com/video/220053622
Features
- Attempting to make space switching more accessible
- Supports multiple modes: space,orient,follow
- Space Pivots for easy constrainable spaces
- Contextual marking menu for handy switching
Accessing
- UI
- Top cgm menu.
CGM> TD/Create> Rigging Utils> Dyn Parent Tool - TD Marking menu.
Utils(NW)>cgmDynParentTool(N) - Anim/Puppet Marking menus.
Utils(Bottom)>cgmDynParentTool
- Top cgm menu.
- Python
from cgm.core.tools import dynParentTool as cgmDynPrntTool
reload(cgmDynPrntTool)
cgmDynPrntTool.ui()

#or

cgm.core.tools.dynParentTool.ui()
Regardless of how you got there, you should see something like this:
Yours won't have anything loaded though. Let's dig in.
Terminology
- Dynamic Parent Group (dynParentGroup) - A metaclassed group setup from a dynamic child for switching that child
- Dynamic Child (dynChild/target) - The controlled object that is able to keep clean animation channels while following other spaces
- Dynamic Parent (dynParent) - A specified parent for a dynChild stored to a dynParentGroup to switch between.
- Mode (dynMode) - The mode the dynParentGroup is in. Currently supports:
- 0 - space - Most typically used option, target follows the space of the target
- 1 - orient - Target follows the orientation of the target
- 3 - follow - Target follows the position of one space and the orientation of another. Most useful for a head for example.
- Space Pivots(Pivots) - This is our solution for having easily constrainable spaces that change scene by scene.
- Alias - A string that displays for a given dynParent so that what displays in the attribute switcher and marking menu makes more sense. Instead of master_anim or whatever it can show
world. It works by a string attribute stored to a dynParent calledcgmAlias. This is used for more functionality to similar effect in our other systems as well.
Tip
The alias can be changed in referenced assets and when done via the gui will update the enum attributes accordingly.
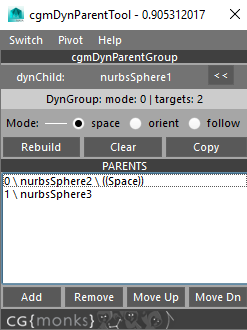
UI
Menu
Switch
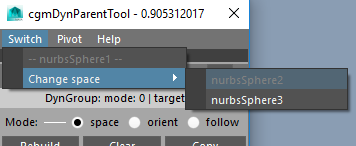
Contextual menu that builds a switcher based on item selection regardless of what is loaded to the ui.
- Depending on mode, the options in the switcher will change. For example, for follow mode you will get both
change orientToandchange followoptions with flyouts for each one. - If multiple objects are selected and they both have dynParentGroups, a multi switch will be an option as well to select shared options.
Note
The switch can be added to any of your own menus. See below: Adding to your own Menu
Pivot
Menu for adding/editing space pivots. Currently it only works off of loaded objects and not selection. For best use, your source control should be zeroed out.
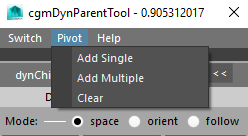
- Add Single - Adds a single space pivot
- Add Multiple - Add as many pivots as you like from a provided prompt
- Clear - Clear all space pivots from the loaded object and rebuild the dynParentGroup
cgmDynParentGroup
The top section is divided into a couple of parts. Let's take a look one by one. Here's a basic ui window again.
DynChild
This section is for loading an object to the tool. With a given transform selected. Hit the << button to load it. The tool will populate with what it finds. If a dynParentGroup is detected it will load the rest of the ui with that information.
Popup
There is a left click pop up menu on any loaded object.
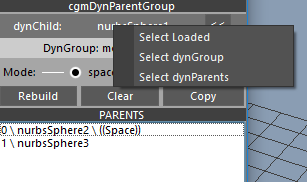
- Select Loaded - Select the loaded dynChild
- Select dynGroup - Select the dynGroup
- Select dynParents - Select the dynParents of the loaded dynChild
Report
The noninterative row report data found.
...- Nothing foundNo dynParentGroup detected- dynChild loaded, but hasn't been builtDynGroup: mode: 2 | targets: 3- dynGroup found. It's mode and the number of targets.
Mode
This lets you change the mode for the next rebuild of the dynParentGroup.
Tip
Your mode will not change until your build your dyn group again.
Buttons
Rebuild- If dynParentGroup exists, make one. If one exists, rebuild it (taking into account new mode for example).Clear- Clear all parts of a loaded dynParentGroup.Copy- Copy the current dynParentGroup to any selected objects.
Parents Scroll List
Here you will find a list of parents connected to the dynParentGroup. Let us look at the ui again.
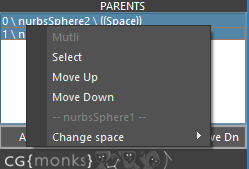
Here is a line we'll break down: 0 \ cat(cat_jnt) \ ((Space))
0- The index of the dynParentcat(cat_jnt)- This is showing an alias. The Alias is shown first, the object is in the()((Space))- This designates that the this dynParent is the active dynSpace target for our dynParentGroup and dynChild
Popup
The scroll list items have right click menu and double click functionality.
- Doubleclick - This will select the parent in maya
- Right Click - Single parent selected
- Right Click - Multi parents selected
Single
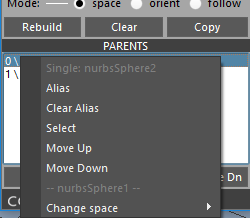
Alias- Add or change the alias of a given parentClear Alias- Clear the alias attributeSelect- Select the parents in mayaSwitch-Move Up- Move selected up in the listMove Down- Move selected down in the list
Multi
Select- Select the parents in mayaMove Up- Move selected up in the listMove Down- Move selected down in the list
Buttons
These functions are somewhat contextual. They work both off of maya selection and dynParent list.
Add- Add selected as parentsRemove- Remove selected as parentsMove Up- Move selected up in the listMove Up- Move selected down in the list
Practical Uses
Referenced Assets
The easiest way to set things up is to add as many (and maybe a couple of more) space pivots in your base rig as you think you will need. In actuality you will probably never need more than 3 to which you can switch between in even complex scenes.
When animating in your referenced scene say you want to animate a hand along a staff and still want clean animation channels. In this case your dynParentGroup would be setup as a space setup more than likely.
- Select your control that has been setup with switching and has at least a single space pivot.
- Key your control on the frame before you want following enabled. This will key in your current space.
- Turn on the space pivot you want to use via the attribute on your control.
- Position the space pivot where you want your new space.
- Constrain that space pivot to the prop
- Use the ui or marking menu to change your current space to the space pivot you have been using.
- Your control will now track your prop from this point forward on the timeline.
Switching Setup
There are a couple of ways to handle switching. Through the ui but more practical is via the marking menu.
Currently the marking menu is setup in anim and puppet modes in the [cgmMarkingMenu](markingmenu.md). To do so. 1. Select any objects with a dynParentGroup setup. 2. Activate the marking menu. You'll see a contextual switcher and visible on load. Easiest just to try it out.
MocapBakeTool
...
SnapTools
Last Updated: 27 October 2017
Overview
cgmSnap is a new tool that refactors some functions we had around the toolbox as well as a fresh push of new features in November 2017. You can access features by our marking menu, a standalone ui and the top cgm menu.
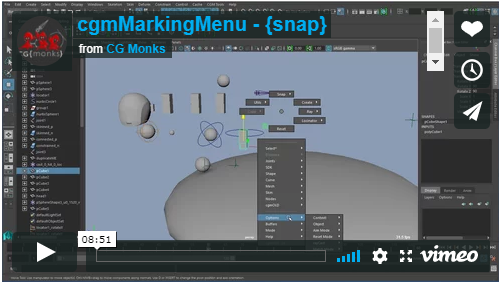
Until we get embeded video sorted. Please use this link: https://vimeo.com/205492894 to see the marking menu implementation.
What can I do with it?
- Do basic snapping with a myriad of pivot targets
- Raycast snapping and aiming
- Match snapping tools for updating items on the fly
- Use various pivot options for snapping without affecting object's pivot
Pivots
In general, positional snapping works by rotatePivot(rp) as that is the main pivot an animator uses in maya. A pivot is a point in space. There are tools for changing pivots on the fly when animating (see DynParenTool for our implemenation of that). These tools allow you to access a lot more options while not changing the underlying pivots. Let's first talk about the kinds of pivots we'll be working with.
rotatePivot(rp)
The main pivot maya uses. When you translate or rotate in general in maya you're working with this point. This is the default pivot for any snapping and querying functions.
scalePivot(sp)
In maya you have the ability to change the scale pivot of an object separate from its rotation pivot. An example of this we use is for scaling the foot for example where the rp is at the ankle and the sp is at on the ground to scaling the foot doesn't push it into the floor.
closestPoint(cp)
This is one the first of our special positions we use. Given a object to snap and a group of targets, it will find the closest point on all shapes of the target objects. These calls support shapes of the following types: nurbsCurve, nurbsSurface and poly
Maya's bounding box call is a world centric box encompassing the shapes of the target objects or components. Commonly this is a part of resetting pivot points to the center of the object's shapes for example.
In addition we have some additional mode calls for this:
center- Default mode with bounding box queries. The center of the boxfront/z+- Directionally speaking we consider z+ forward and y+ as upback/z-top/y+bottom/y-left/x+right/x-
axisBox(ab)
A new concept we're experimenting with. This is a local space bounding box where the box follows the local rotational data of the target. The initial reason for this was for getting certain positions with nurbs controls which don't work with rayCasting. Supports the same mode calls as boundingBox.
groundPos
The z/x clamped value of the target's rp.
casts
Casts utilize our rayCasting calls. For pivots we're using those casts to get new point information.
castCenter- Given a point to cast from. Cast two opposing vectors to figure out the mid point of that cast.castNear- Closest hit from targeted surfacescastFar- Furthest hit from targeted surfacescastAllNear- Closest hit from all surfaces (except self)castAllFar- Furthest ...
Accessing
UI - Standalone
- Top cgm menu -
CGM > Snap > Snap UI - Marking menu (several of them) -
SnapThat
- Top cgm menu -
UI - Nested
- You can find most of the tools nested in the cgmToolbox
Python
import cgm
cgm.core.tools.lib.tool_calls.cgmSnapTools()
UI
If you open the stand alone ui, you should see something like this image below. When seen from the cgmToolbox it'll just look like the fly out sections in that ui.
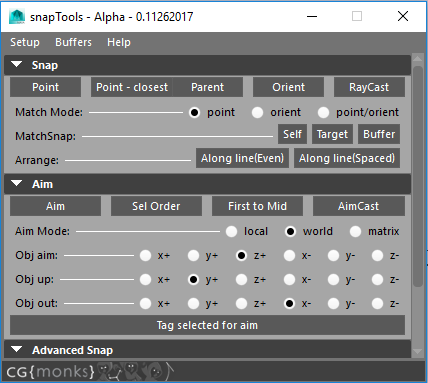
Snap
Functions for snapping items around. In general, they function on a selection basis with all targeting the last.
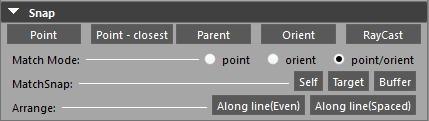
Point- To the last selected objectPoint - Closest- To the closest point on the last surface,curve,shapeParent- Position and orientationOrient- rotation onlyRayCast- Uses the rayCast options to detect a point in space
Match Mode
Options for how matching matches.
point- Position onlyorient- Orientation onlypoint/orient- Both
MatchSnap
If an object is tagged to a cgmMatchTarget, will match the object to the match target. For example, if it is an updatable object, it will update.
Self- Update the selected object to their respective match targetsTarget- Updates the selected's match targets to the selectedBuffer- Update utilizing the match buffer
Arrange
Along Line (Even)- Arrange selected along line from frist to last evenlyAlong Line (Spaced)- Arrange selected along a line snapping middle objects to their nearest point on the line
Aim
Functions for aiming items around. In general, they function on a selection basis with all targeting the last.
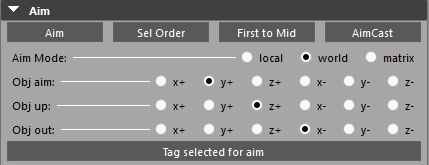
Aim- Currently uses object defaults from Menu. Will take into account object tagging in future.Sel Order- Aim all selected objects in selection order with the last aiming back at the previous oneFirst to Mid- First object aims at the midpoint of the rest of the selectionAimCast- Uses rayCasting to aim selected objects in real time at a point of intersection
Mode
local- Use local vector based on object defaults OR stored aiming optionsworld- Use world vectormatrix- IN DEVELOPMENT Bokser is playing around
Object Defaults
Because assumptions are often wrong.
Obj Aim- Aim axisObj Up- Up axisObj Out- The local out axis for vector work. Out is rarely used and may be deprecated.
Tag Selected for Aim - Adds attributes to selected objects to make them aimable on their own axis regardless of defaults
Advanced
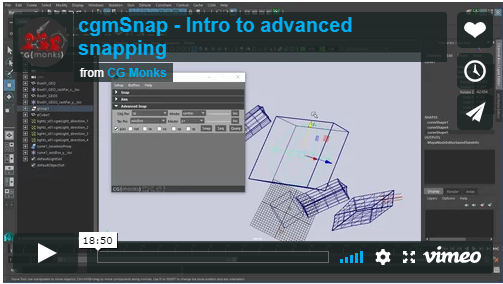
Until we get embeded video sorted. Please use this link: https://vimeo.com/244879615
Advanced snapping functions to access more pivotal data options.
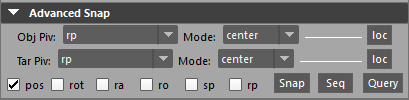
In general with advanced snapping we have our object which is what we want to snap and any targets there after in our selection which are where we will get or target position from.
Note
These functions don't modify the rp of the object to snap unless specified. Instead we use a vector from our rp to the requested obj pivot point and that distance to offset the rp from the target position
Obj Pivot- What pivot of our object to snap we want to work with.Obj Mode- Which mode. See breakdown in bb for more details. Applies toaxisBoxandcastas wellTarget Pivot- What target position we wantTarget Mode- What mode for the target queries
We also have flags to specify what we want to do with the data.
pos- Snap to the position of the queried datarot- Snap to the rotation of the first targetra- RotateAxis ...ro- RotateOrder ...sp- Move the scalePivotrp- Move the rotatePivot
Finally, do something with the data.
Snap- Actually do the snappingSeq- Perform snapping in a sequence of one to the next in reverse order to account for dependencies. For exampleobj1,obj2,obj3will be done asobj2>obj3thenobj1>obj2.Query- Query mode. Just report to the scirpt editor
Tip
For example if you want to snap the bottom of the object you could use the axisBox objPivot and y- mode
SetTools
Status: 2.1 - 02.03.2018
Overview
cgmSetTools is a tool for working with selection sets in maya. The 2.0 rewrite was completed in September 2017.
What can I do with it?
- Filter certain types of selection sets to work with
- Mutiset functionality. Key,reset,delete key on muliple sets as once
- Work with active sets on the fly while animating with the marking set (added in 2.1)
It's best to think of the tool in its two modes: Animation and Setup
Accessing
UI
- Top cgm menu -
CGM> animation> cgmSetTools
- Top cgm menu -
Toolbox>TD>Rigging
Toolbox>Anim
Python
import cgm.core.tools.setTools as setTools
setTools.ui()
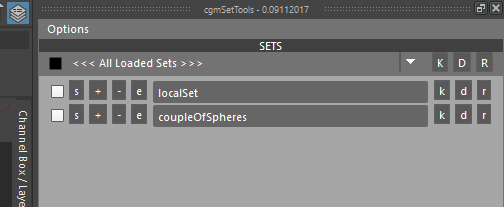
If you open the ui, you should see something like this:
The UI has two main parts. The top menu and body.
Menu
The top menu is where we set our options.
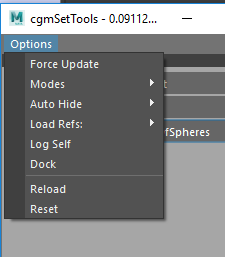
Force Update
Necessary when reloading the scene or if you made changes outside the tool and want to see those changes represented.
Modes
The tool allows for the user to specify which options they want displayed during use.
Anim
When active new options will show up in the ui. Both the muliset function bar and the left options on the row per objectSet.
s- Always visible. Select the items of the objectSet.k- Key the items of the objectSetd- Delete any curent keys of items in the objectSetr- Reset the items of the objectSet
Setup

+- Add selected items to this objectSet-- Remove selected items from this objectSete- Edit mode. When toggled, an additional scrollList is generated below the row's objectSet which offers options on a per item level.
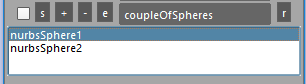
- Currently left clicking any item in the list will select it. Looking into more options. Open to suggestions
Autohide
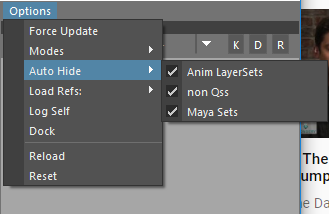
[] Anim Layersets- Hide anim layerset sets[] non Qss- Hide non qss sets[] Maya Sets- Hide default maya sets
Load Refs
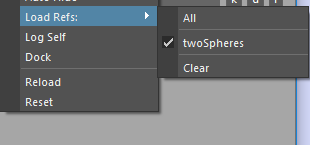
You have the ability to only load the referenced sets you want. By default they aren't loaded. This is most handy with animation sets and multiple assets. The menu is split by:
All- This will activate all reference prefixes[] Prefix- You can toggle individual prefixesClear- If you want to clear all of the reference prefixes
Load Types
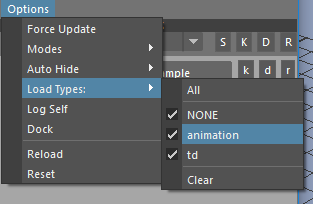
In the same way that you can filter by references you can filter by types (so long as you flag them - best done in the setup files). It's an intelligent loader in that it only shows detected types so that if you don't have any flagged, you'll just see None.
All- This will activate all type flags[] Prefix- You can toggle individual flagsClear- If you want to clear all of the type flags
Dock
You can dock the tool with the dock button. Pressing when docked will undock it. Docked it looks something like this...
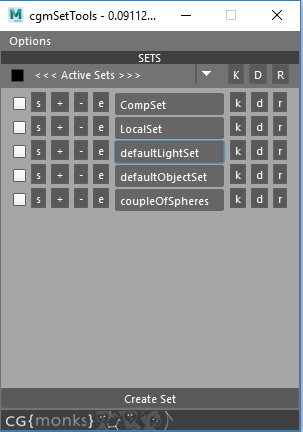
Body
MultiSet Row
Only available with anim mode

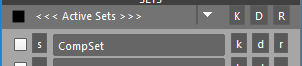
[]- When checked or unchecked all of the checkboxes on all loaded objectSet rows will toggle to match[<<< Active Sets>>>]- Toggle for two different multimodes.- Active sets - Only objectSets with their rows checked will be affected
- All Loaded Sets - ALL loaded sets will be affected
K- Key the items of the objectSetsD- Delete any curent keys of items in the objectSetsR- Reset the items of the objectSets
ObjectSet Row

As previously discussed, certain modes have more options:
s- Always visible. Select the items of the objectSet.+- Add selected items to this objectSet-- Remove selected items from this objectSete- Edit mode. When toggled, an additional scrollList is generated below the row's objectSet which offers options on a per item level.- Currently left clicking any item in the list will select it. Looking into more options. Open to suggestions
[ nameOfASet ]- Textfield that displays the name of the set's base name. Each has an annotation with the set's full name. Additionally, each has a right click menu.k- Key the items of the objectSetd- Delete any curent keys of items in the objectSetr- Reset the items of the objectSet
Popup
Right click menu on the objectSet row textfield.

[] Qss- Qss state. Check to change.Make Type:- Tag as a specific type. Unsure if we're keeping this. It's intended as an additional way to flag sets for filtering.Select set- Select the set itself.Purge- Clear the set but leave the setRename- Bring up a uiPrompt to rename the setCopy- Create a new set with all of this set's itemsLog- Print a breakdown of what's in the set in the script editorDelete- Delete the set
Marking Menu
Added in 2.1 in February 2018 during one of our production swings doing layout work to make working with complicated scenes easier.
The most important thing to remember with them is that for active sets, you currently set them in the ui. You also use the ui to flag the loaded sets to be working with.
Note
Currently this marking menu shares the radial section with the animation marking menu's radial.
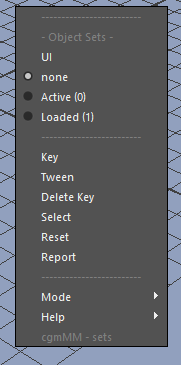
Object Sets Mode
The first section is one where you change you active mode. This is what the marking menu is working with.
UI- Quick access to the uiNone- When in this mode, this section does nothing. It means 'off'.Active (x)- Active sets. This means those sets you have checked on in the ui. The number is the count of active sets.Loaded- ALL loaded sets. So any sets you see loaded in the ui will be affected. NOT all sets in the scene.
Functions
These functions affect the sets as defined by the set mode. These work regardless of other selection and reselects original selection where possible.
Key- Key all objects/attrs as defined by the set modeTween- After selecting all our obj/attrs, activate our pal Morgan Loomis' fantastic dragbreakdown.Delete key- ...Select- ...Reset- ...Report- Report of active/loaded sets.
Tip
If nothing is happening on your function picks in the marking menu. Check your mode. If active mode, are any checked in the ui? Etc
Mesh Tools
Status: 1.0 Release - Fall 2016
Last update: 08.17.2017
Overview
MeshTools are a collection of tools to work with geo (poly or nurbs(for some)). You can find a detailed breakdown on the sections in the links provided.
Core Modules
Main modules this tool is using for those wanting to dig in.
cgm.core.lib.geo_Utilscgm.core.classes.DraggerContextFactorycgm.core.lib.shapeCastercgm.core.lib.rayCaster
Accessing
- Top cgm menu -
CGM > TD > Mesh > cgmMeshTools - Toolbox -
TD Tab> Rigging > Mesh > MeshTools - Python
import cgm.core.tools.meshTools as MESHTOOLS
MESHTOOLS.go()
If you open the ui, you should see something like this:
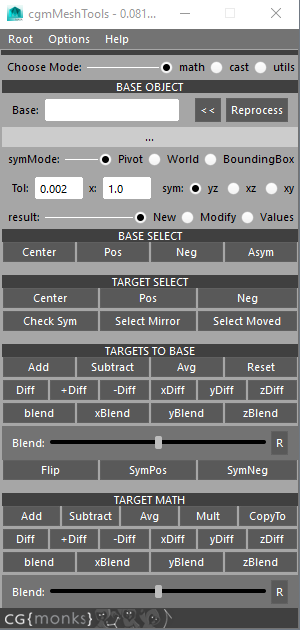
It's divided into three modes: Math, Cast, Utils
Tip
- Previous selections are remembered for subsequent processes if possible
- From/to selection is typical.
Menu
The top menu is where we set our options and get help
Options
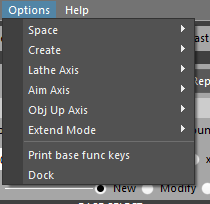
Space- xform space for mesh math functionsCreate- click Mesh create optionsSym Axis- axis to measure symetry fromLathe Axis- curve casting lathe axisAim Axis- object aim axis for shooting raysObj Up Axis- object up axis for casting curves (lolipop for example)Extend Mode- extend mode for how curves are wrapped
Math
The math section is about using the positional data to do math functions similar to other deformers like blendshapes.

Until we get embeded video sorted. Please use this link: https://player.vimeo.com/video/183549761
Tip
- Most math functions now work with soft selection evaluation
- The space section of the options menu affects math functions.
Base Object
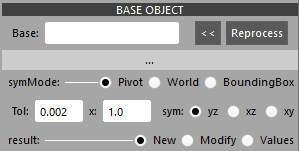
Base [ ]- Text field that displays the base object when loaded<<- Loads a selected mesh as a base. It is then processed for it's symmetry dictReprocess- Recheck the symmetry of a base object to see if you've resolved itReport- Tells how many asymetrical verts there aresymMode- specify which point to base symmetry calculation fromTolerance- How close of a tolerance symmetry should be calculated tox- Value to multiply calculations from on the various buttonssym- Sym axis to measure symetry fromresult- Specify how the result should be usedNew- Create a new meshModify- modify the targetValues- report values
Base Select
Various methods of selecting helpful bits on the base..

Center- select the base center vertsPos- select the base positive vertsNeg- select the base negative vertsAsym- select the asymetrical verts (if there are some)
Target Select
Same as before but on selected target geo.

Center- select a target's center vertsPos- select the target's positive vertsNeg- select the targets negative vertsCheck Sym- select the target's asymetrical verts (if there are any)Select Mirror- selected the mirrored verts of those selectedSelect Moved- selected the moved verts of the selected objects relative to the base
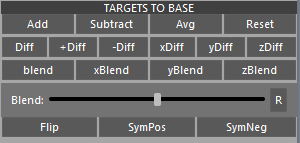
Targets To Base
Functions cast in relation to the base on selected objects. Cumulative effect.
Note
* marks math functions that don't work with soft selection yet
Add- base + target * multiplierSubtract- base - target * multiplierAverage- average(base,target) * multiplierReset- Reset to baseDiff- delta of base - target+Diff- base + (delta * multiplier)-Diff- base - (delta * multiplier). This is what you'd use for 'adding' deltasxDiff- x deltayDiff- y deltazDiff- z deltaBlend- acts like a blendshape with multiplier being the weight valuexBlend- x only blendshapeyBlend- y only blendshapezBlend- z only blendshape
Blend Slider - slider creation of blend
Flip* - Flip the shape across the axisSymPos* - Mirror the positive sideSymNeg* - Mirror the negative side
Target Math
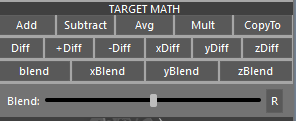
Functions cast on selected objects. Cumulative effect. Last object is treated as the base (except for copyTo). See previous section for more details.
Cast
This was our intial pass on rayCasting with geo in a ui form.
Until we get embeded video sorted. Please use this link: https://player.vimeo.com/video/183556460
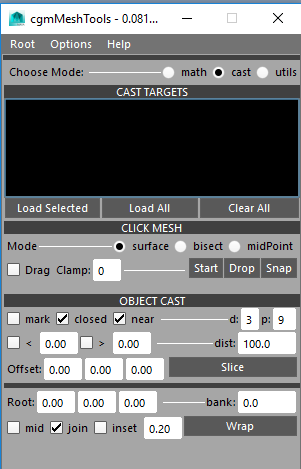
Cast Targets
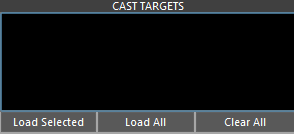
This is where we load our targets to cast if we want to be specific. If no targets are specified, all mesh and nurbs surface objects in scene will be used.
Load Field - Multi select ability enabled. Displays loaded names and mesh types.
Popup - loads on right click on an item
Select- handy if you have a big scene and aren't sure where an item isRemove SelectedRemove Non-selected
Load Selected- Load selected objectsLoad all- Load all eligible targets (geo or nurbs)Clear all- Clear this. When clear, ALL eligible targets will be used.
Click Mesh
For most things toolbox section is probably more intutive except for shapeCasting which it doesn't do.
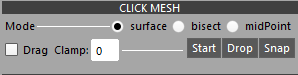
Mode -
Surface- first hitbisect- Piercing cast or all hitsmidPoint- Mid point of hits
[ ] Drag- When checked, rays are cast as long as you clickClamp[ 0 ]- Clamp the number of hitsStart- Start the toolDrop- Force the tool to drop and create non locator objectsSnap- Snap selected objects to cast point based on setting providedCreate- (Options Menu) - What to create for click mesh when tool is released.- Options: locator,joint,jointChain,curve,follicle,group
Object Cast
This is a two part section. Most of the options in the slice section affect the wrap section as well. The general theory is that rays are cast from a given object in order to create curves. To my mind I think of the death blossom from the 80's flick the Last Starfighter spinning around around shooting rays. Works off a given selection of objects and uses the cast targets specified or all if none are.
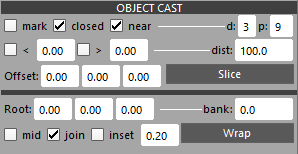
Slice
A slice is a single curve lathe.
Options - Accessed via the options menu
Lathe Axis- curve casting lathe axisAim Axis- object aim axis for shooting rays[] mark- Mark hits. Useful for troubleshooting and using data for other bits.[] closed- Create closed curve[] near- Use the nearest hit or use the farthest hitd [3]- The degree of the curve to create. 1 is linear.p [9]- Points - Number of rays to cast which translates to points of the curve[] < [0.0]- Min Range (with toggle) - Specify range of an angle to cast[] > [0.0]- Max Range (with toggle) - Specify range of an angle to castdist- Distance - Range which to cast our raysOffset: [0.0] [0.0] [0.0]- Offset - Offset of a hit to further process. Use z to push out from the surfaceSlice- Make your mesh curve slice
Wrap
A wrap is a more complicated lathe often with more than one cast point.
Options - Accessed via the options menu
``Obj Up Axis `` - object up axis for casting curves (lolipop for example)
Extend Mode- extend mode for how curves are wrappedSegment- cylider between two pointsradial- single radial cast like the rings of Saturndisc-cylinder-loliwrap-endCap- most often used for things like finger tips
Root: [0.0] [0.0] [0.0]- Root Offset - Offset for our root cast object. May be pulling this from gui call.bank: [0.0]- Bank - Bake for cast object. May be pulling this from gui call.[] mid- Mid mesh cast. May be pulling this from gui call.[] join- Join cast curves. Only used in certain modes.[] Inset [ 0.2]- Inset multplier. Only used with certain modes.Wrap - Make your mesh wrap
Utils
Until we get embeded video sorted. Please use this link: https://player.vimeo.com/video/183669485
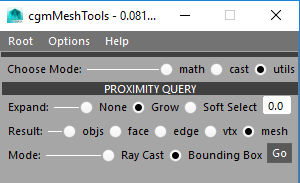
Proximity Query
Create proxi geometry based on a from to selection.
* Expand - Mode by which to expand the found selection.
None-Grow- Grow selection by amount specifiedSoft Select [0.0]- Use soft select to grow by amount specified
Result- What kind of data we want from our processing.objsfaceedgevtxmesh- create a proximesh
Mode-Ray Cast- Use ray casting to check for precisnessBounding Box- Use the much faster bounding box check
Go- Process